



Search
Filters
Close

WWSSDEMO128128D-AA-01#

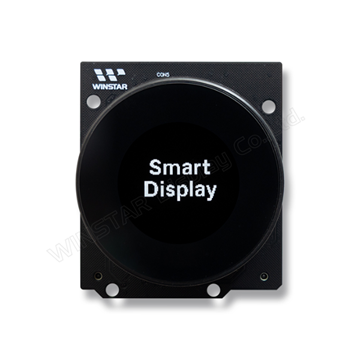
Eval Kit for PMOLED 1.18" Graphic 128x128, Circular, White color, Circular Knob COG, 3.3V, CAN Bus interface with CUSTOMIZABLE CAN ID, Glare, Capacitive touch panel I2C (IC FT3268), Arduino UNO included

DESCRIPTION

This OLED Knob Demo Set provides an intuitive and efficient way to operate the WINSTAR Smart Display. It uses a Custom CAN ID protocol, allowing you to easily control the display with the knob, enabling non-touch operation. This not only enhances user convenience but also extends the control options for the display's functions, making it especially useful in applications that require frequent adjustments to displayed content.

Features and Highlights:

  • Easy Connection: Connect the Arduino UNO with the CAN Shield to the OLED Knob Display Module via the CAN wire, and upload the .wgb file to the WINSTAR Smart Display to begin testing.
  • Non-Touch Operation: Use the knob for intuitive control, avoiding the need for touch operations, providing a more flexible way to control the display.
  • Functional Testing: Test the OLED Knob Display Module's hardware functionality through short touches or rotation, and observe its effects on the Smart Display.
  • Custom Control: Use the Custom CAN ID protocol to control the display's various functions through the knob, enabling non-touch control of the Smart Display.

Requirements: Please note that the OLED Knob Demo Set must be used with the WINSTAR Smart Display for full functionality. Make sure to upload the .wgb file to your WINSTAR Smart Display and connect it to the Arduino CAN Shield before use. This will allow you to easily control the WINSTAR Smart Display with the OLED Knob.

Usage Steps:

  • Upload the .wgb file to the WINSTAR Smart Display using the GUI Builder.
  • Upload the .ino file to the Arduino UNO using the Arduino IDE to execute the demo code.
  • Connect the Arduino UNO with the CAN Shield to the OLED Knob Display Module, and test the display functions by rotating or touching the knob.

Why Choose This Demo Set?

  • Practical Demonstration: Directly shows how to operate the OLED Knob Display Module, suitable for development and testing purposes.
  • Simple and Easy to Use: Plug and play, easily initiate the testing process.
  • Efficient Development Tool: Supports custom code and features, helping you adjust according to your specific needs.

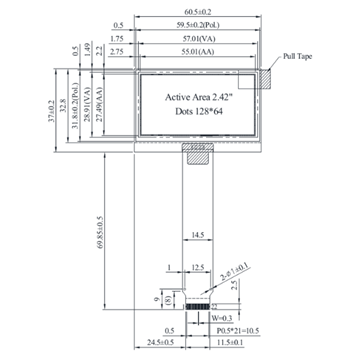
DRAWING

SPECIFICATIONS

General Specifications

ItemStandard ValueUnit
Operating voltage 3.3V and 5V Vdc
Communication Interface OLED: 4-line SPI
CTP: I2C
--
OLED IC   SSD1327 N/A
OLED display size 1.18 inch
Dot Matrix 128 x 128 dots
Module dimension 56(W) ×66(H) ×33.32(D) mm
Active area Ø30.0 mm
Pixel Pitch 0.235 x 0.235 mm
Brightness Min: 60; Typ: 80 cd/m2
LCD type OLED, White color, Passive Matrix
Gray Scale 4 bits
Touch Panel With CTP 1 point
CTP IC FT3268
Surface Glare
Knob switch 3 PINs (PIN1-3) in CON4 for Encoder /
30 detent / 10 pulse


Absolute Maximum Ratings

ItemSymbolMinTypMaxUnit
Operating Temperature TOP -20 +70
Storage Temperature TST -30 +70


Electrical Characteristics

ItemSymbolMinTypMaxUnit
Supply Voltage VCC   3.3   V
Supply Current ICC   180   mA


BOM

ItemDescription
LCM WEO128128W#DP3D00E00­-FC
PCBA SV112812800DA00N0100


Interface Pin Function

CON1 definition:

PinSymbolFunctionRemark
1 TP_SCK CTP clock signal @3.3V Input
2 TP_SDA CTP data signal @3.3V Input
3 NC -- --
4 GND Power supply GND input GND
5 SCLK OLED clock signal @3.3V Input
6 NC -- --
7 SDIN OLED data signal @3.3V  
8~9 NC -- --
10 EN OLED enable of Lo active @3.3V Input
 

CON2 definition:

PinSymbolFunctionRemark
1 NC -- --
2 IOREF I/O reference voltage of 5V Input
3 RESET Arduino system reset Input
4 3V3 Power supply 3.3V Input
5 5V Power supply 5V Input
6 GND Power supply GND input GND
7 GND Power supply GND input GND
8 NC -- --

CON3 definition:

PinSymbolFunctionRemark
1 D/C# OLED data(“Hi”) or command(“Lo”) @3.3V Input
2 TP_INT CTP interrupt @3.3V Input
3 RES# OLED reset @3.3V Input
4 CS# OLED chip select (Lo active) @3.3V Input
5~8 NC -- --

CON3 definition:

PinSymbolFunctionRemark
1 FSW_A Encoder terminal signal-A I/O
2 FSW_B Encoder terminal signal-B I/O
3 FSW_C Encoder terminal signal-C I/O
4~6 NC -- --
 
 
SKU: WWSSDEMO128128D-AA-01#
Brand: Winstar
Available: No
Price Breaks
Quantity
1+
5+
10+
Price
€212.00
€190.80
€179.40

For quantities above 25 pcs pls send your enquiry to [email protected] or call +39 0332 1888005

€212.00 excl tax

DESCRIPTION

This OLED Knob Demo Set provides an intuitive and efficient way to operate the WINSTAR Smart Display. It uses a Custom CAN ID protocol, allowing you to easily control the display with the knob, enabling non-touch operation. This not only enhances user convenience but also extends the control options for the display's functions, making it especially useful in applications that require frequent adjustments to displayed content.

Features and Highlights:

  • Easy Connection: Connect the Arduino UNO with the CAN Shield to the OLED Knob Display Module via the CAN wire, and upload the .wgb file to the WINSTAR Smart Display to begin testing.
  • Non-Touch Operation: Use the knob for intuitive control, avoiding the need for touch operations, providing a more flexible way to control the display.
  • Functional Testing: Test the OLED Knob Display Module's hardware functionality through short touches or rotation, and observe its effects on the Smart Display.
  • Custom Control: Use the Custom CAN ID protocol to control the display's various functions through the knob, enabling non-touch control of the Smart Display.

Requirements: Please note that the OLED Knob Demo Set must be used with the WINSTAR Smart Display for full functionality. Make sure to upload the .wgb file to your WINSTAR Smart Display and connect it to the Arduino CAN Shield before use. This will allow you to easily control the WINSTAR Smart Display with the OLED Knob.

Usage Steps:

  • Upload the .wgb file to the WINSTAR Smart Display using the GUI Builder.
  • Upload the .ino file to the Arduino UNO using the Arduino IDE to execute the demo code.
  • Connect the Arduino UNO with the CAN Shield to the OLED Knob Display Module, and test the display functions by rotating or touching the knob.

Why Choose This Demo Set?

  • Practical Demonstration: Directly shows how to operate the OLED Knob Display Module, suitable for development and testing purposes.
  • Simple and Easy to Use: Plug and play, easily initiate the testing process.
  • Efficient Development Tool: Supports custom code and features, helping you adjust according to your specific needs.

DRAWING

SPECIFICATIONS

General Specifications

ItemStandard ValueUnit
Operating voltage 3.3V and 5V Vdc
Communication Interface OLED: 4-line SPI
CTP: I2C
--
OLED IC   SSD1327 N/A
OLED display size 1.18 inch
Dot Matrix 128 x 128 dots
Module dimension 56(W) ×66(H) ×33.32(D) mm
Active area Ø30.0 mm
Pixel Pitch 0.235 x 0.235 mm
Brightness Min: 60; Typ: 80 cd/m2
LCD type OLED, White color, Passive Matrix
Gray Scale 4 bits
Touch Panel With CTP 1 point
CTP IC FT3268
Surface Glare
Knob switch 3 PINs (PIN1-3) in CON4 for Encoder /
30 detent / 10 pulse


Absolute Maximum Ratings

ItemSymbolMinTypMaxUnit
Operating Temperature TOP -20 +70
Storage Temperature TST -30 +70


Electrical Characteristics

ItemSymbolMinTypMaxUnit
Supply Voltage VCC   3.3   V
Supply Current ICC   180   mA


BOM

ItemDescription
LCM WEO128128W#DP3D00E00­-FC
PCBA SV112812800DA00N0100


Interface Pin Function

CON1 definition:

PinSymbolFunctionRemark
1 TP_SCK CTP clock signal @3.3V Input
2 TP_SDA CTP data signal @3.3V Input
3 NC -- --
4 GND Power supply GND input GND
5 SCLK OLED clock signal @3.3V Input
6 NC -- --
7 SDIN OLED data signal @3.3V  
8~9 NC -- --
10 EN OLED enable of Lo active @3.3V Input
 

CON2 definition:

PinSymbolFunctionRemark
1 NC -- --
2 IOREF I/O reference voltage of 5V Input
3 RESET Arduino system reset Input
4 3V3 Power supply 3.3V Input
5 5V Power supply 5V Input
6 GND Power supply GND input GND
7 GND Power supply GND input GND
8 NC -- --

CON3 definition:

PinSymbolFunctionRemark
1 D/C# OLED data(“Hi”) or command(“Lo”) @3.3V Input
2 TP_INT CTP interrupt @3.3V Input
3 RES# OLED reset @3.3V Input
4 CS# OLED chip select (Lo active) @3.3V Input
5~8 NC -- --

CON3 definition:

PinSymbolFunctionRemark
1 FSW_A Encoder terminal signal-A I/O
2 FSW_B Encoder terminal signal-B I/O
3 FSW_C Encoder terminal signal-C I/O
4~6 NC -- --
 
 
Products specifications
Brand Winstar
Size 1.18"
Resolution 128x128
Active Area (mm) Ø30.00
Color White
Power supply 3.3V
Display Interface CAN Bus
View Angle IPS
Frame Yes
Touch Panel Capacitive
O. Temperature (°C) -20~70
Preferred - Not Preferred Preferred
Download
Products specifications
Brand Winstar
Size 1.18"
Resolution 128x128
Active Area (mm) Ø30.00
Color White
Power supply 3.3V
Display Interface CAN Bus
View Angle IPS
Frame Yes
Touch Panel Capacitive
O. Temperature (°C) -20~70
Preferred - Not Preferred Preferred
Recently viewed